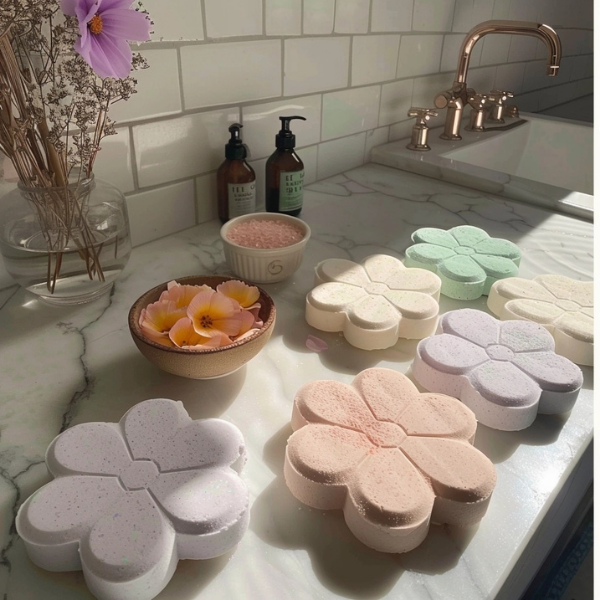
Make soothing DIY flower bath bombs with essential oils and natural colorants. Great for relaxing baths, gifts, and your self-care routine.
Introduction
Bloom into bliss with these gorgeous DIY flower bath bombs. Shaped like delicate blossoms and infused with essential oils, they transform your tub into a fragrant, fizzing spa retreat. These bath bombs are as beautiful as they are nourishing, making them ideal for pampering yourself or creating heartfelt handmade gifts.
Benefits of This DIY Product
- Aromatic Relaxation: Essential oils offer a calming and soothing experience.
- Skin-Softening: Epsom salt and sweet almond oil help nourish and moisturize skin.
- Beautiful Presentation: Flower shapes and petal details add a charming touch.
- Natural Ingredients: Free of artificial dyes and synthetic fragrances.
- Great for Gifting: Makes a thoughtful and luxurious homemade present.
- Fun and Creative: Customize colors and scents for a personalized bath treat.
Ingredients Overview
- 1 cup baking soda – Base that creates fizz.
- 1/2 cup citric acid – Reacts with baking soda for effervescence.
- 1/2 cup cornstarch – Softens water and slows fizz for longer experience.
- 1/2 cup Epsom salt – Soothes muscles and detoxifies.
- 2 1/2 tablespoons sweet almond oil – Moisturizes and nourishes skin.
- 3/4 tablespoon water – Helps bind ingredients.
- 10–15 drops essential oil – Lavender, rose, or citrus for scent.
- Natural food coloring or mica powder – Adds beautiful hues.
- Dried flower petals or bath salt crystals (optional) – For decorative centers.
- Silicone flower molds – Shapes the bombs.
Instructions
- In a large mixing bowl, whisk together baking soda, citric acid, cornstarch, and Epsom salt until well combined.
- In a small bowl, mix sweet almond oil, water, essential oils, and colorant.
- Slowly drizzle the liquid into the dry mixture, whisking continuously to prevent fizzing.
- The mixture should resemble damp sand and hold its shape when pressed.
- Place decorative petals or salts into the bottoms of silicone flower molds, if using.
- Firmly pack the mixture into each mold, pressing down to ensure even shaping.
- Let the bath bombs dry in the molds for 24 hours in a cool, dry place.
- Carefully remove from molds and store in an airtight container until use.
How to Use It
- Frequency: Use whenever you need a relaxing bath experience.
- Amount: One flower bath bomb per bath.
- Best For: All skin types; especially nice for dry or tired skin.
- Patch Test Tip: Test a small amount if you have sensitive skin or essential oil allergies.
Storage & Shelf Life
- Store in an airtight container in a cool, dry place.
- Avoid humidity to maintain fizz and shape.
- Shelf life: 4–6 months if stored properly.
Customization Tips
- For Sensitive Skin: Choose gentle oils like chamomile or calendula.
- For Extra Moisture: Add a teaspoon of shea or cocoa butter.
- For Stronger Scent: Increase essential oils slightly, within safe limits.
- For Color Variety: Use different natural colorants per batch.
Common Mistakes to Avoid
- Adding liquids too quickly: Can cause premature fizzing.
- Not packing molds tightly: May result in crumbling bath bombs.
- Too much moisture: Can cause the mixture to activate and bubble.
- Removing from molds too early: Can cause breakage.
- Improper storage: Humidity can reduce fizz and quality.
FAQs
1. Can I use a metal mold instead of silicone? Yes, but silicone molds make removal easier.
2. Do these color the bathwater? Yes, depending on how much coloring you use.
3. Are these safe for children? Yes, if using kid-safe essential oils and no small decorations.
4. Can I double the recipe? Absolutely. Just store extra bombs properly.
5. Can I skip the essential oils? Yes, but they add aromatherapy benefits to the bath.
Conclusion
These flower bath bombs are more than just a pretty addition to your bath—they’re a self-care ritual. Easy to make, naturally fragrant, and gentle on the skin, they add a special touch to your wellness routine. Make a batch for yourself or share the joy as thoughtful, handmade gifts. Don’t forget to pin this recipe or tag your creations with #diybathbombs!

