SEO Meta Description:
Create a beautiful, vibrant artisan soap stack with natural clays, essential oils, and botanicals. Learn how to make layered soap bars with goat milk, charcoal, and rose clay.
Introduction
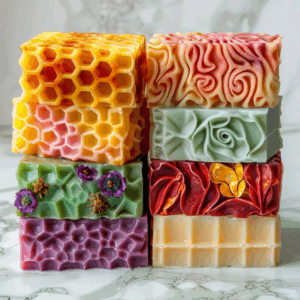
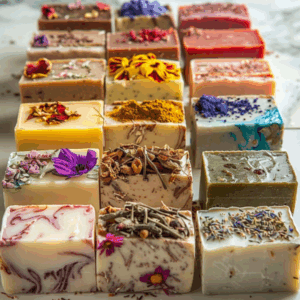
Indulge in the art of soap-making with this Artisan Natural Bar Soap Stack! These uniquely handcrafted soap bars are infused with natural clays, essential oils, and nourishing oils, each creating a vibrant, colorful design. The inclusion of French green clay, activated charcoal, rose clay, and turmeric powder adds visual appeal and skin benefits. With gentle lavender, rose, and lemongrass essential oils, this DIY soap set will leave your skin feeling rejuvenated and pampered. Perfect for your skincare routine or as a stunning gift, these bars offer an artisanal touch to your everyday bath rituals.
Benefits of This DIY Product
- Deep Cleansing: Activated charcoal and turmeric powder detoxify and cleanse the skin, removing impurities and promoting a healthy glow.
- Nourishing: Goat milk and sweet almond oil provide deep hydration and nourishment to the skin, leaving it soft and smooth.
- Soothing and Relaxing: Lavender and rose essential oils help calm the mind and soothe the skin, while lemongrass offers a refreshing, uplifting fragrance.
- Brightening: Turmeric and rose clay help to even out skin tone and brighten the complexion over time.
- Visual Appeal: The layered, colorful soap bars are visually stunning, with textures ranging from smooth gradients to dried flower tops, making them a treat for both the skin and the eyes.
Ingredients Overview
- 16 oz Goat Milk Melt and Pour Soap Base: A rich, moisturizing base that nourishes and soothes the skin.
- 1 tsp French Green Clay: Helps detoxify and cleanse the skin, leaving it refreshed and smooth.
- 1 tsp Activated Charcoal: Known for its ability to absorb impurities and toxins, promoting clear skin.
- 1 tsp Rose Clay: Gently exfoliates, soothes, and adds a subtle rose-colored hue to the soap.
- 1 tsp Turmeric Powder: Known for its anti-inflammatory properties, turmeric brightens the skin and evens out tone.
- 1 tsp Dried Lavender or Rose Petals: Adds a decorative touch to the soap, as well as calming properties for the skin.
- 10 Drops Lavender Essential Oil: Offers a calming, floral scent while promoting relaxation.
- 10 Drops Rose Essential Oil: Provides a soothing, gentle fragrance and helps reduce redness or irritation.
- 10 Drops Lemongrass Essential Oil: Uplifts and refreshes, adding a citrusy scent that energizes the skin.
- 2 tsp Sweet Almond Oil: Deeply moisturizes and nourishes the skin with essential fatty acids.
- Silicone Soap Mold: Perfect for creating unique soap shapes and easy removal once set.
Instructions
Step-by-Step Directions:
- Prepare the Soap Base: Cut the goat milk soap base into small cubes for easy melting.
- Melt the Soap: Place the soap cubes into a double boiler or microwave-safe bowl. Heat in 30-second intervals, stirring in between, until fully melted and smooth.
- Divide the Mixture: Once the soap is melted, divide it equally into 4 bowls for the different colorants.
- Add Colorants: To each bowl, add a different natural colorant:
- Bowl 1: Add French green clay.
- Bowl 2: Add activated charcoal.
- Bowl 3: Add rose clay.
- Bowl 4: Add turmeric powder.
- Add Essential Oils: Add 2-3 drops of essential oil to each batch. Lavender, rose, and lemongrass oils will add fragrance and skin benefits.
- Pour the Soap: Begin by pouring the first color into the silicone mold. Allow it to settle before pouring the next color, creating layers. Optionally, swirl the colors together for a gradient effect.
- Add Decorative Touches: If desired, sprinkle dried lavender or rose petals on top for a beautiful finishing touch. You can also use a honeycomb mold for extra texture.
- Let the Soap Set: Let the soap sit undisturbed for 2-3 hours at room temperature, or refrigerate for faster setting.
- Unmold and Store: Once the soap has fully hardened, gently remove it from the mold. Store in a cool, dry place until ready to use.
How to Use It

- Frequency: Use daily or as needed for a luxurious bath experience.
- Amount: Lather the soap between your hands or directly onto your skin to cleanse.
- Skin Type: Suitable for all skin types, especially dry or sensitive skin due to the nourishing properties of goat milk and sweet almond oil.
- Patch Test: Always do a patch test before using new skincare products to ensure there is no allergic reaction.
Storage & Shelf Life
- Storage: Store the soap bars in a cool, dry place, away from direct sunlight. Keep them in an airtight container to preserve their freshness.
- Shelf Life: These soap bars should last up to 6 months when stored properly.
Customization Tips

- For Oily Skin: Add a few extra drops of lemongrass or tea tree essential oil for their oil-balancing and acne-fighting properties.
- For Sensitive Skin: Reduce the amount of essential oils or opt for gentler oils like chamomile or frankincense.
- For Extra Moisture: Add a tablespoon of honey or jojoba oil to enhance the soap’s moisturizing qualities.
- For Different Colors: Feel free to experiment with other natural colorants, like spirulina or indigo powder, to create different looks.
Common Mistakes to Avoid
- Not Stirring the Colorants Well: Be sure to stir the clay and turmeric powder thoroughly to ensure they dissolve completely and evenly.
- Pouring Too Quickly: When layering the soap, pour each layer slowly to avoid mixing the colors or disrupting the previous layer.
- Overheating the Soap: Be cautious not to overheat the soap base, as this can cause the texture to degrade and affect the colorants.
- Not Letting the Soap Set Long Enough: Let the soap harden completely before unmolding. If it’s too soft, it may lose its shape.
- Skipping the Patch Test: Even natural ingredients can cause irritation for some people, so always patch-test before use.
FAQs
1. Can I use these soaps on my face?
Yes, these soaps are gentle enough for the face, especially with the nourishing properties of goat milk and sweet almond oil. However, always patch-test first.
2. How long will the soap bars last?
When stored properly, these soap bars should last up to 6 months, but it’s best to use them within a few months for the freshest scent and texture.
3. Can I use different essential oils?
Yes! Feel free to experiment with other essential oils like chamomile, peppermint, or eucalyptus to create different scents and skincare benefits.
4. Can I use a different soap base?
Yes, you can substitute the goat milk soap base with other melt-and-pour bases, like shea butter or glycerin, if you prefer.
5. Can I make more than 4-6 bars?
This recipe will make approximately 4-6 bars, but you can adjust the amounts of soap base and ingredients to make more or fewer bars depending on the size of your mold.
Conclusion
This Artisan Natural Bar Soap Stack is the perfect way to elevate your skincare routine with beautifully handcrafted soaps that combine vibrant colors, natural ingredients, and essential oils. With the detoxifying power of clays, nourishing oils, and relaxing fragrances, these soap bars are a true indulgence. Whether you’re making them for yourself or as a thoughtful gift, these DIY soap bars are sure to impress.

